

Setting up a new workspace often brings a quiet sense of accomplishment. You finally picked out a desk, cleared away the clutter, and organized your cables. But then you stare down a heavy cardboard box filled with scattered screws, metal levers, and random plastic covers. Figuring out how they all fit together into a functional seat might seem a bit overwhelming at first glance. Taking the time to properly put together your new furniture generally ensures it will support your posture effectively for the long haul.
Fortunately, putting an office chair together is a fairly straightforward process that almost anyone can handle with a bit of patience. By breaking the assembly down into manageable stages, you eliminate the guesswork that often plagues flat-pack furniture projects. This guide on how to assemble an office chair will walk you through exactly how to construct your seat securely, turning that intimidating pile of metal and fabric into your daily companion.

Preparing Your Workspace and Parts
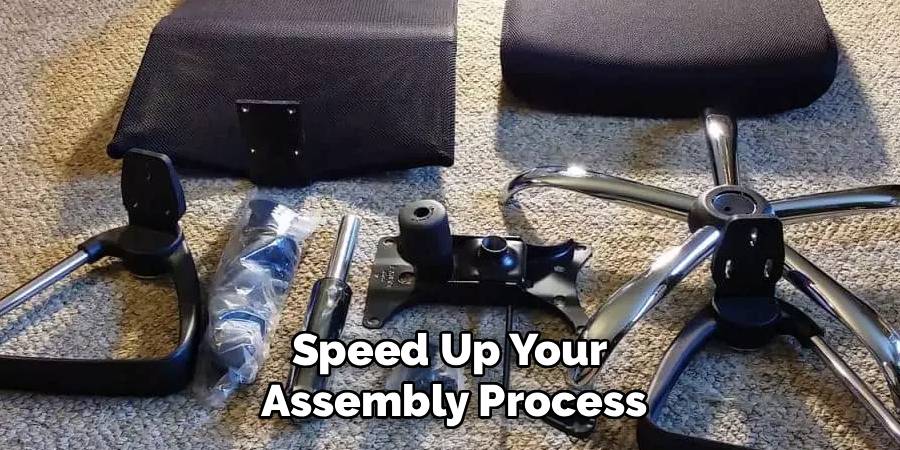
Before twisting any screws or forcing pieces together, you should probably lay everything out on a clean surface. Most models ship in a large box containing the backrest, seat cushion, armrests, star base, casters, gas lift cylinder, and a heavy mechanism plate.
Take the instruction manual and cross-reference the parts list to verify nothing is missing. Grouping the smaller hardware into small bowls usually prevents them from rolling under the sofa during the assembly process.
Tools That Actually Help With Assembly
Once you’ve confirmed all the parts are present, it’s time to gather some tools. While many furniture manufacturers provide basic tools like an Allen wrench or screwdriver, having a few additional tools can significantly speed up your assembly process and ensure everything is put together correctly.
Power Tools
If you have access to them, power tools such as electric screwdrivers or drills with interchangeable bits can make assembling furniture a breeze. These tools can save you time and effort when tightening screws or driving in nails. Just be sure not to over-tighten any screws, which could potentially damage the furniture.
Basic Hand Tools
For those who don’t have access to power tools, fear not! You can still assemble furniture with basic hand tools. A screwdriver, hammer, and pliers are the most common tools needed for furniture assembly. Make sure to have a variety of screwdrivers (Phillips, flathead) on hand in case your furniture requires different types of screws.
A Few Safety Notes
When dealing with heavy metal furniture components, prioritizing your physical safety is a smart move. Always build the chair on a carpet or a protective mat. Keep your fingers entirely clear of the mechanical joints, particularly when attaching the seat plate to the backrest. These specific areas appear to pose a noticeable pinching hazard if they slip.
Make sure you hand-thread all screws initially to avoid cross-threading, which might permanently strip the metal inserts and ruin the chair’s structural integrity.
7 Steps on How to Assemble an Office Chair
Step 1: Attach the Casters to the Star Base
The foundation of your seating arrangement starts with the five-point star base. Turn this base upside down on your blanket so the empty socket holes face the ceiling. Take one caster and firmly push the metal stem into the socket at the end of a leg. You should feel a distinct pop when the wheel locks securely into place.
Sometimes, these casters require a surprising amount of physical force to slide in completely. If you struggle to get them to click, wiggling the wheel slightly from side to side while applying downward pressure often does the trick. Repeat this action for all five wheels. Once finished, flip the base right-side up and verify it sits evenly on the floor.
Step 2: Insert the Gas Lift Cylinder
With the base resting flat on its new wheels, locate the gas lift cylinder. This heavy metal tube is responsible for adjusting your height throughout the day. Remove any plastic protective caps from the ends of the cylinder. Failing to remove these caps usually prevents the height lever from functioning at all. Drop the thicker end of the cylinder directly into the center hole of the star base.
There is absolutely no need to screw or hammer this piece into place. Gravity will wedge it tightly into the socket once you sit down. Most kits also come with a telescoping plastic cover that hides the greasy internal parts. Slide this cover over the top of the cylinder now.

Step 3: Secure the Mechanism Plate to the Seat
Take the padded seat cushion and place it upside down on your table or floor. Locate the mechanism plate and align it with the pre-drilled holes on the bottom of the seat. Pay close attention to the orientation here. The plate almost always has a small arrow stamped into the metal, indicating which side should face the front edge of the cushion.
Using the bolts specified in your manual, attach the plate to the fabric seat. Start by inserting all four bolts and tightening them only halfway with your fingers. This strategy gives you enough wiggle room to perfectly align the heavy plate. Once all bolts are threaded, use your Allen wrench to tighten them down firmly in a crisscross pattern.
Step 4: Attach the Armrests
While the seat cushion remains upside down, locate the two armrests. Check to see if they are labeled “Left” and “Right” so you do not accidentally install them backward. Line up the holes on the base of the armrest with the threaded inserts on the underside of the seat cushion.
Just like you did with the mechanism plate, loosely install all the necessary screws before tightening them down completely. If your chair features adjustable armrests, check that the release buttons face outward. Tighten the screws until the armrests feel entirely solid.
Step 5: Connect the Backrest to the Seat
Attaching the backrest can feel slightly awkward. It sometimes helps to have the seat resting on the edge of a table, or you could simply ask a friend to hold the pieces steady. Line up the metal bracket at the bottom of the backrest with the mounting slot located on the rear of the mechanism plate.
Carefully insert the required bolts. These are usually accompanied by locking washers to prevent loosening over time. Tighten these bolts very securely, as this specific joint bears a massive amount of physical stress whenever you lean back. Give the backrest a firm tug to verify it is rigidly attached.

Step 6: Place the Seat Assembly onto the Cylinder
Now that the upper portion is fully constructed, you simply need to connect it to the rolling base. Lift the entire seat assembly and position it directly over the gas lift cylinder. Carefully align the mounting hole located in the center of the seat plate with the tip of the gas cylinder.
Gently lower the seat until it stops. Sit in the chair and bounce a few times gently. Your body weight will compress the connection between the cylinder and the seat plate, locking everything together safely.
Step 7: Perform Final Adjustments
Your chair is finally assembled. You just need to verify that all the mechanical functions operate smoothly. While sitting, pull the height lever to ensure the gas cylinder raises and lowers without catching. Check the tilt tension knob under the front of the seat to adjust how easily the chair leans backward.
Finally, go over every visible bolt one last time with your wrench. It is incredibly common for some screws to loosen slightly as the components settle into their final positions.
Following these steps on how to assemble an office chair will ensure that you have a sturdy and functional chair to support you during long work hours. In addition to the assembly process, it is important to properly maintain and care for your office chair in order to extend its lifespan.
Common Mistakes to Avoid
One of the most frequent errors people make is fully tightening one screw before the others are even threaded. This habit frequently causes severe alignment issues.
Another common misstep involves forgetting to remove the tiny plastic cap on the tip of the gas cylinder. Finally, many folks accidentally install the seat mechanism plate backward. This mistake results in a chair that slopes awkwardly forward.

Maintenance Tips After Assembly
To keep your chair functioning quietly, you might want to routinely check the hardware every few months. The natural shifting of your body weight causes screws to slowly back out over time. Giving them a quick turn prevents annoying squeaks. If your chair has fabric upholstery, vacuuming it regularly prevents dust accumulation.
Applying a tiny spray of silicone lubricant to the wheel axles once a year keeps the rolling movements silent.
Troubleshooting Assembly Issues
If your seat sinks on its own when you sit down, the gas cylinder may be defective. The adjustment lever could also be continuously pressed against the release button. If the chair wobbles unevenly on your rug, ensure that all casters are pushed entirely into their sockets.
For a chair that squeaks loudly when you lean back, check the bolts connecting the backrest to the seat base. Loose metal-on-metal connections are generally the primary cause of office noise.
Frequently Asked Questions
Q1: How Long Does It Normally Take to Put an Office Chair Together?
For a single person working at a moderate pace, assembling a standard model typically takes between 15 and 30 minutes. The exact timeline depends heavily on the complexity of the specific design. Having a clear workspace can significantly reduce your total assembly time.
Q2: What Should I Do if a Screw Refuses to Go Into the Hole?
If a screw feels stuck or resists turning, stop immediately. Back the screw out completely and inspect the hole for metal burrs or stray fabric blocking the path. Re-align the components carefully, ensure the screw is perfectly straight, and try threading it in by hand before grabbing your wrench.
Q3: Do I Need Professional Help to Build My Chair?
Generally, office chairs are specifically designed for easy consumer assembly. The manuals are usually heavily illustrated to guide you through the process visually. However, if the chair is exceptionally heavy, asking a family member for a second set of hands is a perfectly reasonable choice.
Conclusion
Taking a few extra minutes to build your chair correctly pays off every single time you sit down at your desk. By carefully following the instructions on how to assemble an office chair and aligning your hardware properly, you can easily prevent future discomfort.
Now that your seating arrangement is fully functional, you can adjust it to your unique posture needs and finally get to work.
